HomeRunwayRunway Best Negative Prompts: The Full Guide

Runway Best Negative Prompts: The Full Guide

Getting AI to generate exactly what you want can be frustrating. Thankfully, 
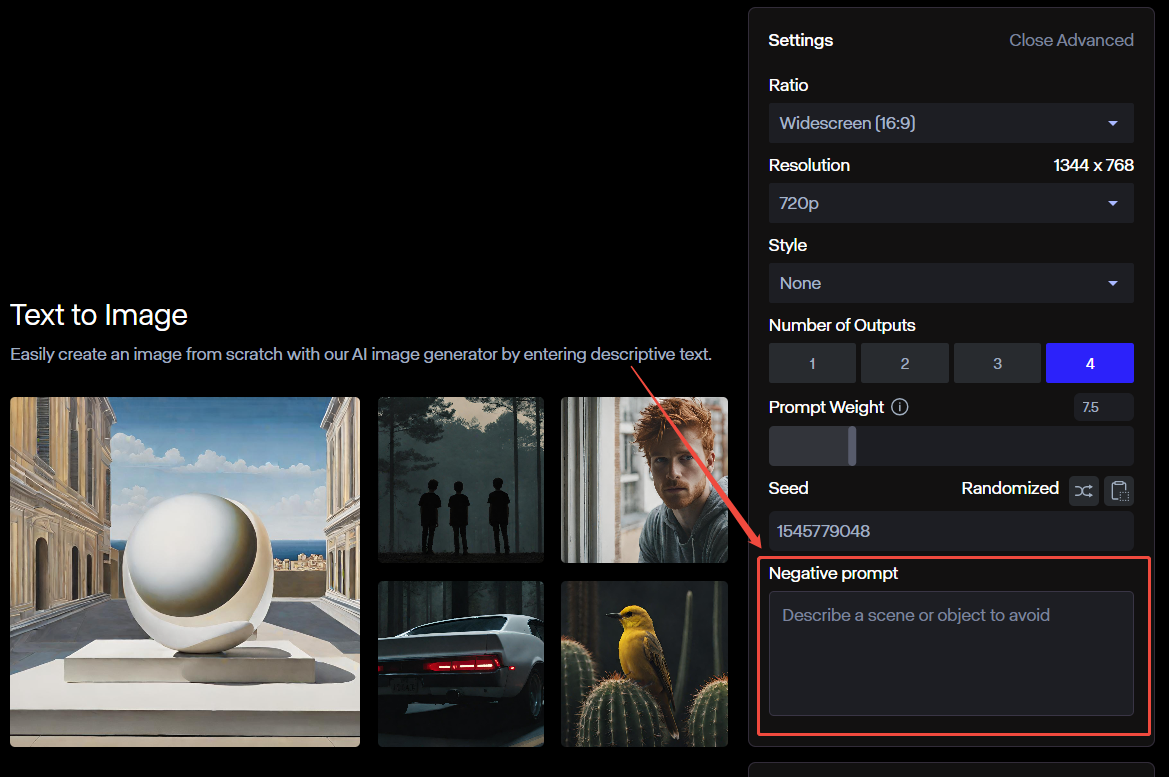
Runway offers a negative prompt feature that lets you remove unwanted elements from AI-generated images. Simply put, instead of fixing mistakes over and over, you can simply tell the AI what to avoid.

However, many people don't know how to input negative prompts in the right way. That's what this guide is all about. We'll show you how to make good use of Runway's negative prompt effectively, share examples, and give you pro tips. Let's get started!

What Are Negative Prompts in Runway?

Negative prompts in Runway help you tell the AI what you don't want in your generated content. Instead of just describing what you want, you can add specific details about what should be avoided. This helps create more refined and accurate results without unwanted elements.

For example, if you're generating an image and you don't want a blurry background, you can use a negative prompt like "no blur" or "sharp focus only." The AI then tries its best to leave out anything related to blur. It's like giving the AI a list of things to ignore.

Note: The negative prompt feature is only available in Runway's Gen-2 model. Runway's other models (like Gen-3 Alpha) do not support it.

Runway negative prompt

How to Make Use of Runway's Negative Prompt

If you want to use Runway’s negative prompt feature, then you will have to follow a few simple steps. Here are the details:

Step 1: Open Runway’s Text-To-Image Tool

First things first—log in to Runway ML and go to the Text-to-Image feature. If you’re new to Runway, you’ll need to sign up for an account before you can start creating AI-generated images.

Once you’re inside the tool, you’ll see a text box on the right. This is where you can type in your main prompt. Remember: the more specific you are, the better your image will turn out.

step 1

Step 2: Write a Strong Main Prompt

Your main prompt is the foundation of your image. If you’re not clear, the AI will make random choices that might not match what you want. So, be as detailed as possible.

Here’s an example of a strong prompt:

"A futuristic cyberpunk city at night, neon lights glowing in shades of blue and purple, detailed skyscrapers with holographic billboards, people walking on the wet streets carrying transparent umbrellas, mist rising from the pavement, cinematic atmosphere, ultra-detailed, highly realistic, dynamic lighting reflections."

step 2

Step 3: Open Advanced Settings to Access Negative Prompts

Once your main prompt is ready, look at the top-right corner of the screen and click on “Advanced.”

This will open extra settings that let you fine-tune your image. At the bottom right, you’ll see a Negative Prompt box.

step 3

Step 4: Enter a Powerful Negative Prompt

Now, let’s use the Negative Prompt box to remove anything you don’t want.

Here’s a great example of a negative prompt:

"Blurry, pixelated, distorted faces. Umbrellas"

step 4

Step 5: Test Different Combinations

AI is not perfect—sometimes, you’ll need to experiment with different words and phrases to get the best results.

Pro Tip: Try changing a few words in your negative prompt each time you generate a new image.

Play around with different settings until your image looks right.

Step 6: Save and Download Your Final Image

Once you’re happy with your AI-generated image, click on it. At the top, you will then see a “Download” icon. Click on it to save the image. Runway lets you download images in 720P resolution if you have a free plan. For 2K resolution, you will have to upgrade your plan.

step 6

Best Examples of Negative Prompt Usage in Runway

Negative prompts help refine AI-generated images by telling the AI what to avoid. However, how you phrase them is important. Instead of just stating what you don't want, the best approach is to guide the AI toward your ideal result.

Below are examples of how to use negative prompts effectively in Runway:

1. Removing Unwanted Objects

When generating images, AI sometimes adds random elements that weren't part of your vision. This could be extra hands, objects, or background elements that don't belong.

Solution: Instead of just saying what you don't want, describe the scene in a way that naturally excludes those elements.

Example:

  • Wrong: "No trees in the background." (AI might still add them because it doesn't understand how to "remove" an object.)
  • Correct: "A wide-open desert with only sand dunes." (This naturally tells the AI to avoid trees without needing a negative prompt.)

2. Preventing Distorted or Unwanted Body Features

AI can struggle with human anatomy, sometimes adding extra fingers, distorted faces, or stretched limbs. These mistakes make images look unnatural and unrealistic.

Solution: Instead of saying "no extra fingers," describe what you want clearly so the AI has a structured guideline to follow.

Example:

  • Wrong: "No extra fingers" (AI may still struggle with hand anatomy.)
  • Correct: "A close-up of a human hand with five fingers." (Now, the AI understands exactly how many fingers it should generate.)

3. Avoiding Blurriness or Unwanted Textures

Sometimes, AI-generated images don’t come out as clear as you’d like. They might look blurry, pixelated, or just lack sharpness.

How to Fix It: Instead of just saying "no blur," be more specific about what you want. AI works best when you guide it with clear instructions. Rather than telling it what to avoid, tell it exactly what to focus on—sharp details, high resolution, and a clean, well-defined look.

Example:

  • Wrong: "No blurry background." (The AI might still create something slightly out of focus.)
  • Correct: "A sharp, high-resolution image with clear, well-defined details." (This tells the AI exactly how you want the image to look, improving the final result.)

4. Avoiding Unrealistic or Cartoonish Styles

When generating portraits or landscapes, AI can sometimes create exaggerated or overly stylized images instead of realistic ones.

Solution: Instead of saying "no cartoon effects," tell the AI exactly what kind of style you want.

Example:

  • Wrong: "No cartoon effects" (AI might still create an exaggerated look.)
  • Correct: "A photorealistic portrait with natural skin textures." (This forces the AI to focus on realistic details.)

Tips for Writing Effective Negative Prompts in Runway AI

Writing negative prompts effectively can save time and improve results. Here are some tips to make your negative prompts more effective.

  • Be Specific and Clear – Avoid vague words like "bad lighting" or "messy details." Instead, describe exactly what you want to remove, such as "no overexposed highlights" or "no unnecessary background clutter."
  • Avoid Contradictions – If you say "no dark colors" but also say "a dramatic, moody scene," the AI may struggle. Make sure your negative and positive prompts don't conflict.
  • Combine Negative and Positive Prompts – A good balance of both ensures better results. Example: Instead of just saying "no extra limbs," say "a human with normal proportions and five fingers on each hand."
  • Don't Overuse Negative Prompts – Too many restrictions can confuse the AI. Stick to the most important details you want to exclude rather than listing every possible mistake.
  • Consider the AI's Limitations – AI-generated images can still have flaws, even with strong prompts. If the AI keeps adding unwanted elements, we suggest simply rewording your prompt.

With these tips, you can get better results every time!

Conclusion

Negative prompts in Runway AI help you create better images faster. They make the AI more accurate, save time, and improve image quality.

To get the best results, use clear and specific instructions. Instead of listing too many restrictions, focus on the most important things. If you overload the prompt with too many negatives, the AI might get confused and generate strange results.

When used correctly, negative prompts make AI-generated images look more polished, professional, and exactly how you want them. Try it out and see the difference for yourself!

Related Posts

How to Use Kling AI in India

Create amazing AI videos in India with Kling AI. After learning how to do this, discover why Pollo AI helps you fully utilize Kling AI.

How to Fix Kling AI Network Error: Troubleshooting Solutions

Experiencing a Kling AI network error? Find out why the error happens, the solution and the best alternative to Kling AI to use.

How to Create AI Kissing Videos with Pollo AI

Find out how to create AI kissing videos instantly with the help of the leading AI kissing video generator, Pollo AI.

10 Best Sora Alternatives for Generating Stunning AI Videos

Discover the top 10 Sora alternatives for generating stunning AI videos. Explore these alternatives to Sora for creating high-quality, visually captivating video content easily and efficiently.