How to Choose an AI Video Workflow for Different Goals
TL;DR
I find image to video most useful for animating product photos, text to video for exploring ideas without existing visuals, and video to video for restyling footage. For social posts and ads, I choose based on whether I need one shot or a complete sequence. Pollo AI is a good starting point because it brings these options together, including Agent workflows for complete videos.
How to choose an AI video workflow in 3 steps
Step 1: Decide what the viewer needs to see
Before writing a prompt, I ask what someone should take away from the video.
For a product showcase, I might want them to notice the drink’s appearance. For an ad, I need to give them a reason to try it. That changes the shots, pacing, and amount of information I include.
I use four questions to narrow the task:
- Product showcase: Which product details need to stand out?
- Social video: What makes the opening worth watching?
- Concept exploration: What idea or mood should come through?
- Advertising: What should someone understand and do next?
I also decide whether one shot can do the job. A moving product image may be enough for a listing. An ad usually needs more context, plus a clear ending.
Step 2: Start with the material you already have
A useful photo or clip can save me from rebuilding a scene from scratch.
- I have a clear image: I start with image to video. The image establishes the subject and composition. My prompt focuses on what moves.
- I have an idea but no images: I use text to video to explore the setting, action, and style.
- I have footage with the action I want: I consider video to video to give it a different look.
Then I choose the framing for where the video will appear. I want a vertical social clip composed for a phone screen from the start.
For the first generation, I keep the movement simple. One action and one camera move give me a clearer sense of what needs adjusting.
For a longer sequence, I also plan the scene order. I want to know what opens the video, what develops the idea, and what closes it before generating the full piece.
Step 3: Test the part that matters most
I start with the shot most likely to decide whether the idea works.
For a product video, that might be a close-up where the label must stay recognizable. For a social clip, it is often the opening. For a concept, I want the scene that captures the whole idea.
I check the result against that purpose:
- Product showcase: Does the product still match the photo?
- Social video: Can I understand the opening immediately?
- Concept exploration: Does the scene convey the intended mood?
- Advertising: Is the message clear, including the next action?
If the product changes shape, I reduce the movement or improve the source image. If the opening feels slow, I change the timing or composition.
I save the prompt and settings alongside each version. It makes a useful result much easier to build on.
Four examples for different video goals
1. Product showcase: animate an iced coffee scene
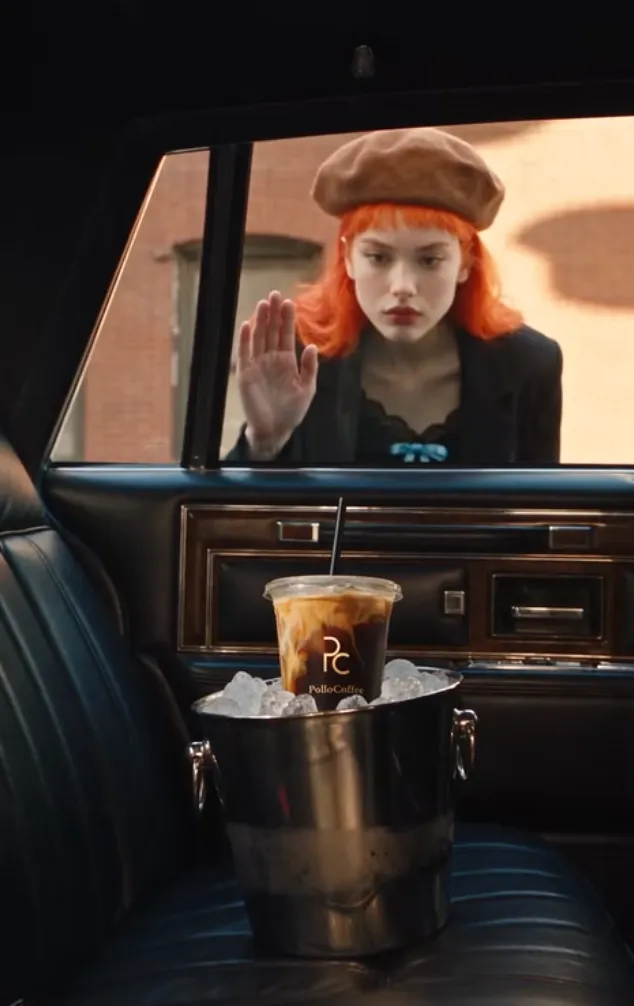
I started with an image of iced coffee sitting in a polished metal ice bucket on a black leather car seat. An orange-haired woman was visible outside the window.
I used image to video to turn that setup into a short product story. The woman noticed the coffee, picked up a stone, smashed the window, and took the drink. The sequence ended with her running away, still holding the same cup.
I set the video to around 12 seconds with vertical framing. I kept the camera inside the car for the window scene, then included a street-level tracking shot for the ending.
Prompt:
Animate the image into a 12-second vertical video. From a fixed camera inside the vintage car, show the woman staring at the iced coffee. She picks up a stone, smashes the side window, reaches through the opening, and lifts the coffee cup out of the metal ice bucket. Cut to a street-level tracking shot as she runs away holding the coffee. Keep her face, orange hair, outfit, and the cup’s design and logo consistent. Leave the ice bucket on the car seat.
| Input Image | Output Video |
 |
After generation, I checked the window-breaking moment, her hand reaching for the cup, and the cut to the street. I compared the coffee’s appearance before and after she took it, along with her face, hair, and outfit.
The coffee gave the action a clear focus. It caught her attention in the opening and stayed with her through the final shot. For this test, keeping that product recognizable mattered more to me than adding extra camera movement.
2. Social video: restyle a coffee-pouring clip
I chose video to video because I already had the action on camera. The source was a short vertical clip of coffee pouring into a cup, with a steady camera and a clear view of the stream.
I kept the clip around five seconds and chose a warm, hand-drawn look. My goal was to give the footage a different feel while keeping the pour easy to follow.
Prompt:
Restyle this coffee-pouring clip as warm, hand-drawn animation. Preserve the pouring action and framing. Use soft morning light and a consistent illustrated style.
| Input Video | Output Video |
I reviewed the coffee stream, cup edges, and hand holding the pot. Those details gave me a clear way to check whether the style stayed consistent through the action.
I also watched the clip at phone-screen size and checked the first second. I wanted the pour to be visible immediately, without an empty lead-in.
For this test, I judged the workflow by how well it carried the original action into the new style. Audience response was a separate question that needed publishing data.
3. Concept exploration: create a library above the clouds
I started with text to video for this scene. I had a setting in mind, but no image that captured it: a vast library floating above the clouds at sunrise.
I kept the first shot around five seconds and used widescreen framing for this AI video. I wanted to establish the space and mood before adding characters or dialogue.
Prompt:
A vast library floats above the clouds at sunrise. A few loose pages drift gently through the air. The camera moves slowly forward through warm, cinematic light.
Output Video:
I reviewed the composition first. I looked at whether the library was recognizable, whether the clouds gave it a sense of height, and whether the camera movement made the space easy to follow.
I also checked how much attention the drifting pages took away from the building. The library was the central idea, so I kept the surrounding action minimal.
I treated this as an establishing shot for a short story with connected scenes. It let me assess the setting before planning recurring characters and preparing references for later shots.
4. Ad creative: build a short bottle campaign through Pollo Agent
I chose a video agent workflow for the ad video because I needed several scenes to carry one message. I started with a clear bottle photo, confirmed product information, and a short campaign brief.
Before generating, I planned three parts: an opening line, a product close-up, and a closing CTA. I kept the full video around 15 seconds and used vertical framing.
Prompt:
Create a 15-second vertical ad from this bottle photo. Open with “Meet your daily desk companion,” show a clean product close-up, then end with “Shop now.” Keep the bottle design consistent. Add background music.
Output Video:
I watched the first version without sound to check whether the product and message were clear on their own.
Then I reviewed the text timing and compared the bottle across scenes. I paid particular attention to its lid, proportions, and color. I also checked whether the closing frame gave me enough time to read the CTA.
For this test, I focused on the ad’s structure and clarity. I kept product claims tied to confirmed information and left clicks and sales for live campaign testing.
Comparison: which AI video workflow fits each goal?
| Goal | What I start with | My first choice | What I check most |
| Product showcase | A product photo or prepared scene | Image to video | Product details, framing, and movement |
| Social video | Existing footage, images, or a short script | Video to video for restyling; a sequence workflow for a story | Opening, pacing, and phone-screen composition |
| Concept exploration | A written idea or mood reference | Text to video | Setting, atmosphere, and whether the idea comes through |
| Ad creative | Product assets, product information, and a brief | Video agent workflow | Message, product accuracy, readable text, and CTA |
Limitations to consider before choosing an AI video workflow
Product details can change
A cup can look convincing while its lid or label changes during the shot. I check those details against the source image throughout the video.
For people, I pay similar attention to faces, hands, and clothing. The first frame alone does not tell me enough.
Complex actions need more careful planning
A person reaching for a product while the camera circles them creates several things to get right at once.
I break a complicated sequence into shorter shots. That also makes a weak moment easier to replace without starting the whole video again.
Check the export options early
Before building a full video, I check the available duration, aspect ratio, resolution, format, and audio options.
I also preview the result in its intended layout. A readable caption in a large player may become too small on a phone.
Budget for the clips you keep
I count how many attempts it takes to get a usable shot. That gives me a more practical view of cost than the price of one generation.
If a scene keeps failing, I reconsider the source material, action, or workflow before spending more on similar attempts.
Check what you can upload and publish
I check that I have permission to use the source photos, footage, music, faces, and voices.
For client work, I also review the service’s current commercial-use and privacy terms before uploading confidential material.
FAQs
When should I choose image to video instead of text to video?
I choose image to video when I already have a product photo, portrait, or scene to animate. Text to video works better when I have an idea but no starting image.
When is video to video the right workflow?
I choose video to video when existing footage already has the action and framing I need. It lets me explore a different visual style while checking that the original movement stays clear.
What should I do if AI changes my product’s appearance?
I start with a sharper product image, simplify the action, and reduce camera angle changes. When exact product features or operation need to be shown, I add real footage.
How can I keep a character or product consistent across AI video scenes?
I reuse the same images and descriptions to keep characters and products recognizable across scenes. I check faces, clothing, logos, and proportions, especially at cuts.
When should I choose an Agent workflow for AI video?
I choose an Agent workflow for ads, explainers, or stories that need several connected scenes, text, and sound. My brief specifies the audience, message, scene order, and closing action.
How can I balance AI video quality, speed, and cost?
I test one representative shot before generating the full video. I compare how many attempts each workflow needs to produce a usable result, including any time spent fixing details.